Can You Paint Vinyl Windows
Published on July 4, 2015
in
Windows
0 Comment
Tags: vinyl
Can You Paint Vinyl Windows
You are planning on painting your home. But white windows just do not fit the color scheme. The question comes up. Can you paint vinyl windows? Not to long ago the answer to “can you paint vinyl windows” would have been no. With the advancements in the paint formulas the answer is yes. If you visit a paint store or ask a painting contractor, it is natural for them to say “no”.
Chances are you may already be happy with your vinyl windows. When planning your painting project, choose the best color scheme that complements the white vinyl windows. If your color palette you choose just does not go with white, then take on the extra work and paint your vinyl windows.
Vinyl windows are designed to be attractive, energy efficient and durable. To best prepare them for the painting process, a few of the important paint pros must be cleaned properly. A primer must be applied on that sticks to the vinyl. Afterwards, you can then paint
But before doing the painting job, check with the window manufacturer. Ask them “can you paint vinyl windows”? If they say “yes”, find out their suggestions. Better yet, check on the best color scheme that looks good on your vinyl windows. Painting vinyl windows is a labor intensive job.
If you are planning on replacing your windows along with the painting project, some manufacturers will have the vinyl painted for you. This will be an added cost. Although this may not be a practical option, this may still be considered
What Colors Can You Paint Vinyl Windows
Here are a few of the significant tips that can help you in deciding the palette that best work for your home. For instance, for your white windows, the excellent colors to choose from are those that complement well with your cool palette. A brick masonry, black roof, and white windows are perfect with a grayish or white body. This still depends on its architectural character and age. You may choose an accent of eggplant, brick red, green and navy for a decorative trim or shutters.
Take note that the contrast between the white windows and dark body causes them more to “pop”. This may not be the result that you want. So, you must bear this in mind.
For your white vinyl windows, it is best to just stick with the clearer colors. They should not be that bright. But remember, a pure color may look better instead of white. The result is a cleaner and crisper edge.
Pastels are best added with white color that works well with your vinyl windows. They are even great for cottage styles and Victorian homes. The most perfect combination to try on is a green body with its coral door.
And, for off white or almond vinyl windows, you can better choose warmer and more muted colors. The tones of bisque, greens, browns and terra cotta along with a yellowish undertone are handsome. They are great when combined with the natural stone. Why not choose a distinct color scheme of ivory, turquoise and adobe? They remain to be the most classic one in the Southwest.
If you are really interested in the process of painting vinyl windows, choosing the best color reflects your character and personality. To your question “can you paint vinyl windows” the answer is yes.
Can You Paint Aluminum Siding
Published on June 1, 2015
in
Siding
0 Comment
Tags: aluminum siding
Can You Paint Aluminum Siding
Tired of the dull look of the aluminum siding in your home? Want to bring back the curb appeal of your property without spending too much? Can you paint aluminum siding? You can make it possible by choosing from these two options.
First, replace the aluminum siding with vinyl siding. Second, you can choose to apply a new coat of paint on the siding for its vibrant and fresh appearance.
So, yes! You can definitely paint aluminum siding. An aluminum siding paint job typically lasts from 15 to 20 years. A nice benefit, isn’t it? But, you can only benefit from this if you get the paint job done the right way. What’s the definition of the right way?
Prepare Well – Start with Surface Cleaning
One thing you need to remember when painting aluminum siding is to prepare first. Going through the preparation process ensures the success of the project. By preparation, it means you need to check the existing siding and see if it has any issues, such as dents or unlocked or missing pieces. If there are issues, better fix them first before proceeding with the painting project.
 Cleaning the surface of the material is also an important part of the preparation process. You can do some power washing to remove dirt and chalky paint on the siding’s surface. Clean the surface using mild detergent and proceed with the power washing. When pressure washing, always begin at the top part of the siding going down. Let the surface dry completely for about 24 hours.
Primer Application
Once the surface is completely dry, you can start applying on the primer. This is an important application for the coat ensures that the paint will bond properly and strongly to the surface. Choose a good latex primer and apply it using airless sprayer or roller.
But, is application of primer really necessary? Basically, it depends on the condition of the aluminum siding. If the material is already weathered down or the surface comes up with discolorations or stains, then applying a primer is necessary.
It is also a good solution if you want to ensure the longevity of the paint job. You can also determine if primer application is necessary by performing an adhesion test. The concept here is that when the paint comes off once the tape is taken off, the application of primer is required.
What You Need to Remember – Paint Products to Use
It is not good to simply choose the first can of paint you will find. If you want the paint job to last for a long time, you need to use only the best aluminum acrylic paint. As for the color, you can choose whatever you prefer.
However, it is best to choose paint colors that will not upset your neighbors. Or, if you are planning to sell the property, prevent prospective homebuyers from freaking out. To prevent any of those, your safest option is to choose a color that is similar to or complements the shades used at the neighboring houses.
Remember, a painted aluminum siding does not require maintenance as compared to other painted surfaces. But, there are cases when you would want to clean the surface without affecting the paint job. You can still do maintenance cleaning. Just perform a light washing that makes use of a detergent.
Can you paint aluminum siding? The answer is yes. Start planning to get your home’s aluminum siding painted, by calling the professionals to do it? Call Holencik Exteriors at 610-262-0919! They are professionals offering aluminum siding painting along other painting services!
How To Paint Vinyl Siding
How to Paint Vinyl Siding
Do you think that it is time for your home’s vinyl siding to be replaced? But, are you still looking for an alternative that is more cost-effective? Is it even possible to paint vinyl siding? There is an alternative and that is by means of painting vinyl siding! The answer is yes. This leads to the next question. How to paint vinyl siding.
In fact, there are now paints that are specifically designed for vinyl siding application. This innovation makes it possible for homeowners and business owners to settle on a more budget-friendly option than replacing the material. Unfortunately, not all people are aware that this type of siding can be painted.
In your quest on how to paint vinyl siding, you only need to have the right kind of paint. The next step, you must choose the most appealing and suited colors that help improve the siding’s appearance. In the end, you will even succeed in giving your home a new look without spending as much.
It’s Now Possible to Paint Vinyl Siding. But Why Would You Want to do so?
 Painting vinyl siding is beneficial in many ways. It improves the material’s durability. In terms of the labor needed to complete the job, it can be said that it is less labor intensive. This is the case when compared to painting masonry, hardboard and wood surfaces. This siding’s surface is even easier to clean because it does not keep the moisture. It also dries up quickly.
Now, how can you take advantage of these? There is only one thing that needs to be done. This is by means of considering and following the steps on how to paint vinyl siding. Doing so ensures you of getting the job done the right way. But before proceeding to the process, you need to know one thing first.
How To Paint Vinyl Siding -Be Weather Wise
Painting vinyl siding requires application during ideal conditions. So, gather some information about the weather forecast in the area first. The best conditions to start a vinyl siding painting project are during the days with mild temperature; an overcast sky and low humidity. Avoid applying paint on the siding if it is in direct afternoon sunlight. Doing so only makes it prone to flaking and cracking after a while.
How To Paint Vinyl Siding – The Process
Cleaning
Before starting the painting project, the vinyl siding’s surface must be cleaned first. Chalk, dirt, mildew must be removed for optimum adhesion. Surface cleaning can be done by power washing or hand scrubbing. Use the power wash with caution if you choose to perform this cleaning method.
Priming
Priming is not required most of the time. At most, only those porous vinyl siding or pitted area requires to be primed. But if it is necessary, ensure to use only the best and most trusted primer products.
How To Paint Vinyl Siding – Picking the Paint to Use
One thing you need to remember is not to reach for just any can of paint. It is your goal for the paint not only to look good on the vinyl siding, but for it to also last. That can be most assured by selecting the best paint products that contain urethane resins and acrylic.
These ingredients accommodate the contraction and expansion of vinyl. But, make sure that the coating would stick. Use paint color that is lighter or has the same shade as the current one used. With most paint manufactures this is the case. You can use Sherwin Williams paint with confidence. Maintain and extend the longevity of your paint job’s life by power washing the vinyl siding during the spring season.
Looking for a professional who knows how to paint vinyl siding. You can find a reliable service provider in Holencik Exteriors. Feel free to call at 610-262-0919 or visit www.holencikpainting.com to know more!
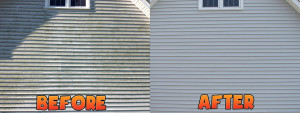
Can You Paint Vinyl Siding
Can You Paint Vinyl Siding
It was during the 1950s when vinyl siding was launched in the market. It was introduced as a replacement for another type of siding, the aluminum siding. Back then, it was known as a less expensive alternative that does not need to be repainted due to rotting or peeling.
But, that was something too good to be true. Then, the drawbacks associated with it began materializing. These drawbacks include the fading of color over time due to sun exposure. This left people wondering if there was any way they can remedy the issue without getting a new replacement. The question can you paint vinyl siding was brought up.
Unfortunately, painting vinyl siding was not a good option back then. This is due to the reason that it can cause some serious effects like warping. Years passed, and it remained as the case. But, the advancement in technology still brought up the question, “can you paint vinyl siding”? About 10 or 20 years ago, the answer would be a big no-no. But now, time has changed.
Advances in Paint Technology has Taken Place Making it Completely Possible to Paint Vinyl Siding
Painting vinyl siding has not just become possible. Highly-rated painters now consider this as a cost-effective alternative to replacing the siding. This type of siding is also possible to be painted, as long as the process is done correctly. The question is no longer can you paint vinyl siding. It is what steps do you need to take to ensure a successful vinyl painting job?
Vinyl Siding Surface Preparation – A Vital Aspect to a Successful Painting Job
There are various reasons why people decide to paint their home’s sidings. Although it is a siding material known for longevity, one that can last for 50 years, it still can fade and get dirty overtime. Yes, the siding can be cleaned up completely.
But, painting is still recognized as the perfect means of bringing it back to its good and new appearance. However, before painting is done, the siding needs to be cleaned first. In this case, the process fully requires the use of a power washer combined with house cleaning agent containing mildewcide.
It must be remembered that the preparation is essential to be performed for the success of the painting job.A clean surface is a must before the painting job is started. The preparation also includes the application of adhesive primer and high-quality acrylic paint.
Once the application of the adhesive primer is done, adding 2 coats of 100% acrylic paint is recommended. It is also best to apply the paint using a spray gun. Using acrylic paint is a must to ensure that it bonds over with the vinyl surface. It is also a must to use acrylic paint designed with vinyl-safe technology for better results. Using thick paint is not advised because it only flakes once applied on vinyl surface.
Can you paint vinyl siding is not the only question. Choosing the brand of paint is also an important aspect of the preparation. Not every brand of paint can be used on dark colors, like dark blue and black. This is due to the reason that it only bubbles overtime due to continued sun exposure.
The longevity and the right kind of paint are two important factors that must be considered when selecting the paint. Since vinyl is considered as an elastic material, the paint to be used must also be capable of expanding and contracting. Hence, it is best to choose paints that are made from urethane and mixed with acrylic resin. When the question, Can you paint vinyl siding, arose, the answer was no. Today the answer is yes, you can paint vinyl siding.
Need professionals to do the painting job for you? Contact Holencik Exteriors at 610-262-0919! They can do commercial and residential painting services!
Glazing Windows
Published on April 20, 2015
in
Painting
0 Comment
Tags: glazing
Glazing Windows
Windows have been used in most buildings for ventilation and day lighting. According to studies, comfort, productivity and health are improved because of the ventilation and light from windows. If there is a continued access to the natural light, then the better the atmosphere will be. If you are not going to replace your old window, then glazing windows will be a necessary part of home maintenance.
Windows may sometimes represent a great source of discomfort, condensation issues and heat loss. The good news is that in the recent years, windows have gone through a technological revolution. Glazing windows is no longer a part of home maintenance. If you decide to install replacement windows, they come with glazing that last the life of the window.
Replacement Windows are perfect in dramatically cutting pollution sources and energy consumption. They also have a lower loss of heat. There is also less air leakage. The window surfaces are also improved for minimized condensation and discomfort.
These glazing windows feature a triple glazing or double glazing. They also have their unique and transparent coatings. The insulating gas is sandwiched in between the panes and improved frames. Due to these many features, they further help in the reduction of maintenance. Thus, they cut the need for glazing windows.
Glazing Windows A Lost Art
Glazing windows is becoming a lost art. Glazing windows is truly a task that is not difficult for expert people. If you decide on hiring the help of a service provider, Holencik Painting is your best choice. This gives your windows a lift. By asking help from them, you’ll be satisfied on the process of glazing the windows.
Apart from it, there is an opportunity of saving more time and money from hiring them. Only the best job is done that is worth the effort and the time.
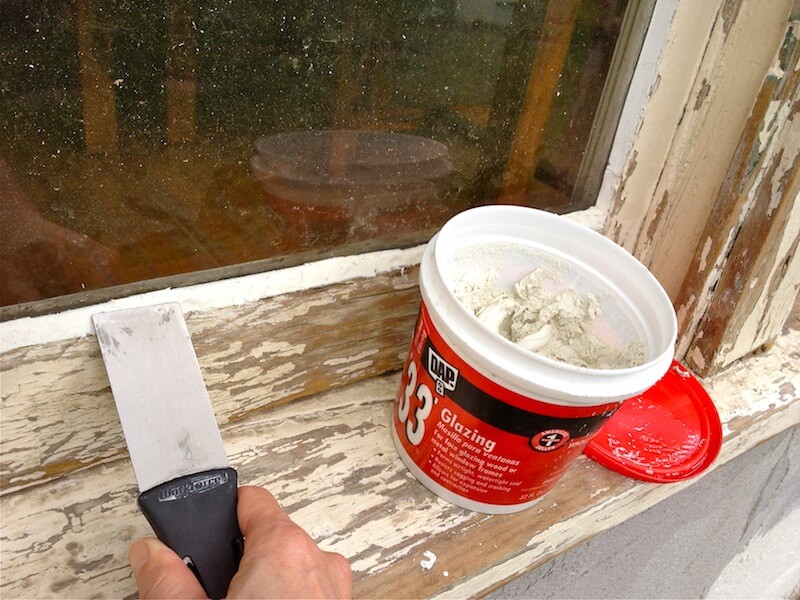
On the other hand, the tools needed in glazing windows are simple. If there is a worn, old, chipped or cracked glazing on your window, it must be removed. It is best to make use of a heat gun that softens the old glaze along with a putty knife and sandpaper.
Putty knifes may be utilized in scraping off the glass. This can also be done by sanding a folded up piece of sandpaper that reaches into the corners. Scraping or sanding away any old paint and glazing compound can be a tricky task for the inexperienced. Cracking panes of glass is the most common thing that happens to the inexperience when preparing for glazing windows.
More so, there are two different types of glazing that can be found on the market. They are the latex-based and oil-based. Latex is more convenient to work with. If you are in dire need of a smooth-looking and professional glaze, oil is the best for glazing windows.
For your glazing windows needs, it is best to rely on the trained professionals at Holencik Exteriors. They will give you the finished painted windows you are looking for. They are ready to provide you with the best service on glazing windows that satisfy you!
Fix Leaky Gutters
How to Fix Leaky Gutters
Gutters are used to direct rainwater to the appropriate drainage area to avoid any damage to the house or drainage and flooding problems. However, they end up collecting all other debris that ends up falling from the roof including leaves and branches. Most homeowners tend to overlook the maintenance of gutters and over time they may develop leaks at different spots. The accumulation of branches and leaves and also snow in colder climates, is bound to contribute to leaky gutters as their structure becomes weaker over time. For those who like simple do-it-yourself projects to keep their house in the best condition. Below we will look at some useful tips on how to fix leaky gutters.
Before delving into the different ways of how to fix leaky gutters, it is essential to first note that gutters exist in two different variants. There are plastic and metal gutters available today. The fact that they are made of different materials means that they require different repair methods and equipment. Homeowners should begin by inspecting their home’s gutters to find out exactly what they are made of to determine what method to follow.
Fix Leaky Gutters – Metal
In most cases, metal gutters are the norm especially for older structures. The simplest way on how to fix leaky gutters that are made of metal is to scrape the joint and clear any debris and then dry it. Once dry, use a caulking gun to inject roofing and gutter sealant. If the leak persists then, it may require more work to repair your leaky gutter as described below.
Where the leaky gutter is not repaired by a simple application of sealant, it will be necessary to dismantle the entire gutter joint clean off the old and dried up putty and then apply a new sealant. Dismantling gutters may be problematic considering that the spike and ferrules used to hang the gutters may not pull out easily without damaging the gutters. It is then going to be necessary to replace the gutters instead of repairing them.
Fix Leaky Gutters – Plastic
Leaky gutters made of plastic, on the other hand, require less work as compared to metal gutters. Plastic gutters mainly leak around unions or joints that connect to the gutters to lead water downwards. In this case the most common cause of such leaks is the accumulation of dirt that forces the gaskets sealing the union to give way.
To fix leaky gutters made of pvc, press the pipe inwards to release the clips holding the pipe leading water down to the union. Once it releases you can check to see whether cleaning the accumulated dirt will be enough to fix the leak or installation of a new gasket is required. There are also PVC gutters that you can clean the gutter joints, then dry the pvc leaky gutter joint. You fix leaky gutter joints by applying a sealant recommended for pvc gutters. Regular maintenance will prevent leaky gutters.
Frozen Downspouts
This week’s number one problem has been frozen downspouts. Weather conditions have been perfect for freezing downspouts. Once the route down is frozen, the gutters will drip over and form those pretty icicles you’ve been seeing. I have been seeing the icicles, and frozen downspouts, all over town.
What can you do about this?
Prevention: Downspouts freeze quickly if the water flow is stopped somewhere along the way.

In the recent storm, the heavy wet snow was enough to block water flow at the bottom, if the ends weren’t shoveled clear. Because of the thawing and refreezing this week, downspouts also froze up at the elbows. Prevention involves clearing the ends of the downspouts and also keeping an eye on the elbow joints.
Downspouts collected ice inside, where the downspouts were dented or bent. Long-term prevention involves checking for bends and dings in the downspouts before winter sets in.
Action: On line advice about frozen downspouts varies. Some say just leave it alone. Others recommend taking ice-melt to the gutters (see below.) A few say heat the gutters to clear them. One recommends whacking the gutter (from an upstairs window) with a baseball bat. Yet another recommends running electrical heat tape to prevent melting.
What to look for to prevent a big problem?
The main reason that you don’t want your gutters icing up is two-fold. The worst thing that can happen is for the melting ice to find its way into your house. The second worst thing that can happen is that the ice in the backed-up gutter gets heavy enough to tear the gutter off the house.
Prevention: To prevent water in your house, your roof should be installed with a sheet of rubber under it. This way, if water collects on the edge of the roof, it won’t find its way through the waterproofing. The second prevention measure is to keep your roof cold. This means insulating and ventilating your roof surface. (This is also good for lowering your heating bills.) A warm roof allows snow to melt at the bottom edge, then refreeze overnight. Then, the subsequent melting the next day increases the build-up of ice that will melt the next day, and so on. The more melting water, the more weight and pressure; these are conditions that favor water finding its easiest route down is through the wood behind your gutters. The third preventative measure is to make sure your gutters are draining well before the winter sets in. Most gutters collect leaves and debris that can impede to flow enough to allow freezing, even if the downspouts are clear. Clear and check the flow in your gutters sometime in the fall, after the leaves have fallen and before the cold sets in.
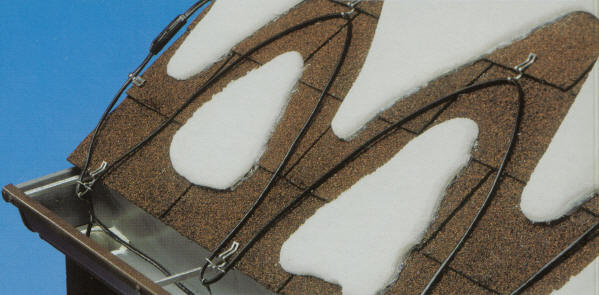
Action: If you see awesome quantities of ice collecting in your gutters and your downspouts are frozen, you may want to take evasive action. The tried and true method is to fill a stocking with ice melt and put it in the gutter. If this is a chronic problem that happens every year, using an ice rake to clear the snow near the bottom of the roof may be an option (depending on how high your roof is.)
The last-ditch and most expensive and inefficient method is to install heat tape to melt the snow and prevent the refreezing.
Frozen Downspouts
Frozen Downspouts was written by : Rona Fischman
Painting Preparations
Painting Preparations
Good painting preparations is the key to a good paint job. Most reputable painters will take care of preparation work before beginning the job. This is something that needs to be discussed before signing any contracts. Homeowners should clearly understand how much or how little preparation work each contractor is intending to do.
Furniture.
Remove all furniture from the room that is about to be painted. If furniture cannot be easily taken out, move it to the center of the room and cover it with a drop cloth.
Surface.
Paint should only be applied to a clean, well-prepared surface. Any peeled or cracked paint must be removed through either scraping or sanding. Simply painting over peeled or cracked paint allows these unsightly problems to quickly reemerge. All mold and mildew on the surface should also be removed before applying new paint. Existing glossy paint should be “dulled” or “deglossed” through sanding so that a good bond between the old paint and the new paint is formed. Holes should be filled or patched. The area should be cleaned using a strong cleaner, such as a TSP, or trisodium phosphate, solution.
 Primer.
Primer provides a base for new paint for the paint to adhere, and it makes the paint more durable. Before painting, prime any uncoated surfaces, bare wood, repaired areas, paneled walls, existing oil-based paint, or any areas that are undergoing a significant change in color.
Fixtures.
Before painting, unscrew and remove all fixtures and outlet covers from the walls. This will save time during the edging process.
Tape.
Masking tape is commonly used to keep paint off items that cannot be removed, such as glass, built-in fixtures, door handles, and latches. An alternative to masking tape is painter’s tape. It is frequently chosen because it has lower tack than masking tape, making it easier to pull off. To keep stray paint from seeping underneath the painter’s tape, painters may try rapidly running a flat tool down the edges of the tape. This friction causes heat and melts the tape’s glue. When the glue dries, it will create a stronger barrier that is more difficult for paint to penetrate.
Article courtesy of: HomeReports.com
How Often Should Gutters Be Cleaned
How often should gutters be cleaned?
It depends! Some houses can go for a couple of years between cleanings. Others need cleaning twice a year or more. Each situation is different
Develop a history
Starting out to find how often cleaning is needed the gutters and down spouts should be checked twice a year for signs of blockage, leaks and possible overflowing. If you live in a high rainfall area or have a lot of trees hanging over the house you may want to increase the frequency of checking the gutter system. As you check the system and track the need for cleaning after a season or two it will be very clear what is needed for gutter cleaning frequency
For those who can not see any of the gutters from inside the house and do not climb ladders checking the system for blockage can be relatively easy. On clear days check of signs of mold or streaking on places the gutters may over flow. Observe the siding for discolorations indicating water leaks. Just when it starts to rain go to the out let of he downspouts and if water does not flow very soon after the start of a heavy rain you know that something is blocking either the gutters or leaders. If you want to stay dry and the garden hose spray can reach the roof the same test can be done of the system by spraying water on the roof and simulating a rain, checking the water flows down the system as it saturates the roof and fills the gutter.
This way you do not have to clean the gutters more often than needed. Regardless if you are doing it yourself or paying some one to climb up and clean the gutters no one wants to waste time energy or money on something that is not needed.
Cleaning frequency
Prior to having a history on when gutter cleaning is need for a house follow this rule of thumb. Gutters and downspouts should be cleaned and checked for signs of necessary repairs at least twice a year. Typically, the best times to do this are spring when the tree seed pods and flower debris are down and fall when the leaves are down but take care not to wait so long a prolonged freeze sets in. Each year this window of opportunity can be very different. The late fall option can be difficult if put off too long and you get into snow and freezing weather were it is not safe or practical to work on gutters. If you suspect a problem or live in an extremely rainy climate, then perhaps, you should check and clean the gutters more frequently. If there are a lot of trees that are high or over hang the roof then the need for cleaning will naturally increase the frequency. Some people cannot tell in advance the need for gutter cleaning so just wait till the gutters show a problem then have them cleaned. This method can stretch out the need for cleaning but also lead to a sudden death playoff with problems in the winter being the hardest to resolve if there are freezing conditions. If you live in an area that winter is cold enough for freezing then you can get ice dams in the gutters and water pouring into the house as melting snow from the heat inside works up under the roof since the ice blocks the normal flow of water off the roof. As you keep track of how much material is removed at cleaning, how full the gutters are and if there are blocked downspouts you will know what the right frequency is. Most houses always have bad spot and areas of guttering that stays clear.
“How Often Gutters Should Be Cleaned”
Was written By Dana Huntley of Gutter Cleaning Hampton
http://guttercleaninghampton.com
Two Coats Of Paint
Two Coats of Paint Make a Big Difference
Normally, we recommend two coats of paint, the main exception being applying the same color and sheen on the existing surface. Trying to make a single coat of paint look great, especially over another color, can stretch the limits of full hiding, and the finished paint job lacks the deep, rich finish that customers want to see. With one coat of paint, it is virtually impossible not to have slight misses where the paint does not fully cover, and unsightly roller marks can show up as well.
Two Coats of Paint – Prep Work
First, let’s address the question of priming and sealing. If stains are noticeable or the old paint is cracked or flaky, it’s important to properly prepare the surfaces to be painted. Sometimes this requires a good deal of scraping, sanding and/or spackling. If you want a quality job, you need a solid foundation before painting starts. If scraping exposes bare wood or unsealed drywall, a primer coat is necessary. Primers are thinner than top-coat paints so they penetrate better, seal the substrate and contribute to improved stain blocking. If the surface to be repainted is in sound condition but just faded, marked-up, or simply in need of new color that is not too different from the original color, it’s usually fine to skip the primer application.
Two Coats of Paint Also Use Quality Paints
Open two cans of paint and they look pretty much the same, but better materials found in today’s better paints can’t be identified in the can – only on the walls.
For our customers, two coats of paint are generally the rule. Two coats of paint will always look richer and more beautiful after the paint dries. And after all, you’ve got to live with it for a long time, so you might as well really love looking at it.
Spray Painting
Spraying makes sense for large surface areas where masking is minimal. For instance, we can spray the exterior siding of a house, then repaint the trim. This significantly minimizes the amount of masking that needs to be done. In many residences, interior spraying doesn’t save enough time to warrant its use. Where spray painting makes sense, we will let you know what the benefits may be for your home.